| Lesson 7 | Create a tree in an existing forest |
| Objective | Create a tree. |
Creating a New Tree in an Existing Forest in Active Directory on Windows Server 2019
This guide will provide you with step-by-step instructions on how to create a new tree in an existing forest in Active Directory on Windows Server 2019. The new tree will be added to an existing Active Directory forest, and the process will require domain administrator credentials.
Prerequisites:
Prerequisites:
- An existing Active Directory forest on Windows Server 2019.
- An additional server running Windows Server 2019 to be promoted as the domain controller for the new tree.
- Domain administrator credentials for the existing forest.
Procedure:
- Configure the new server's hostname and IP settings:
- Open Server Manager.
- Click 'Local Server' on the left pane.
- Click on the computer name to change the hostname, and click 'OK' to apply changes.
- Click 'IPv4 address assigned by DHCP' to assign a static IP address, and configure the DNS server to point to the existing forest's domain controller.
- Install the Active Directory Domain Services (AD DS) role on the new server:
- In Server Manager, click 'Manage' and then 'Add Roles and Features'.
- Click 'Next' until you reach the 'Select server roles' page.
- Check the box for 'Active Directory Domain Services', and click 'Next'.
- Click 'Next' until you reach the 'Confirm installation selections' page, and then click 'Install'.
- Wait for the installation to complete and click 'Close'.
- Promote the new server as a domain controller for the new tree:
- In Server Manager, click the notification flag in the upper right corner and select 'Promote this server to a domain controller'.
- In the Deployment Configuration page, choose 'Add a new domain to an existing forest', and select 'Tree Domain'. Click 'Next'.
- Enter the fully qualified domain name (FQDN) of the new tree domain, which should be distinct from the existing forest root domain. Click 'Next'.
- Provide the domain administrator credentials for the existing forest and click 'Next'.
- Choose the functional levels for the new tree domain, and enter a Directory Services Restore Mode (DSRM) password. Click 'Next'.
- Review the DNS options and ensure a delegation is created for the new tree domain. Click 'Next'.
- Confirm the NetBIOS domain name for the new tree domain, and click 'Next'.
- Verify the default paths for AD DS database, log files, and SYSVOL folder. Click 'Next'.
- Review your selections, and click 'Next'.
- Allow the prerequisite check to complete, and if there are no issues, click 'Install'.
- The server will automatically reboot after the installation process is complete.
- Verify the new tree creation:
- Log in to the new tree domain controller using the existing forest domain administrator credentials.
- Open the Active Directory Users and Computers (ADUC) console by pressing 'Win + R', typing 'dsa.msc', and pressing 'Enter'.
- Confirm that the new tree domain is visible under the existing forest.
You have now successfully created a new tree in an existing forest using Active Directory on Windows Server 2019.
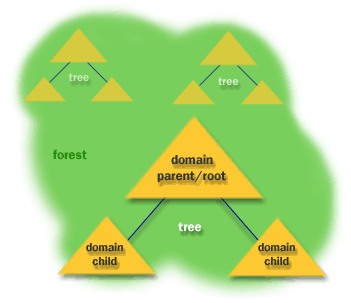
A tree, you may recall, is a group of domains that share a contiguous namespace. A parent domain and its "descendents" (child domains and their child domains, and so on) make up a tree. As shown below, the name of each child includes its parent's name as part of its own:
After you establish the root domain, you can add a new tree to the existing forest if your network plan requires multiple trees. Like the process for creating a root or child domain, creating a tree is fairly straightforward. You should practically be able to complete this
process in your sleep by now.
How to create a tree
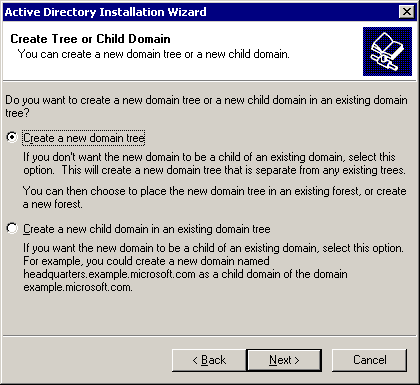
- Tell the wizard that you'd like to create a tree, rather than a child domain.
- Opt to place the tree in an existing forest, as in this example:
Following Specifications
- Then make the following specifications:
- The username, password, and domain name of a user account in the Enterprise Admins group, which exists in the root domain of the forest
- The DNS name of the new tree
- The NetBIOS name of the new domain
- Locations of the Active Directory database and log files
- Location of the shared system volume
- Whether to weaken permissions to support users who access the network through remote access servers running Windows NT 4.0
The wizard will complete the installation process by adding three new consoles to the Administrative Tools menu on that computer. In the next lesson, we will wrap up this module.
Ad Active Directory Field Guide
Create Tree in Existing Forest - Exercise
Click the Exercise link below to test your knowledge of how to create a tree.
Create Tree in Existing Forest - Exercise
Create Tree in Existing Forest - Exercise