| Lesson 6 | Creating and configuring site links |
| Objective | Create and configure site links. |
Creating Configuring Site Links
After you configure the sites for your network, you create site links in Active Directory to map the connections between the sites.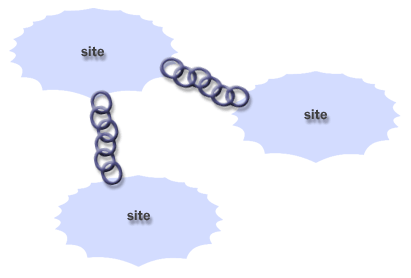
Without site links to connect your Active Directory sites, the domain controllers in the different sites would not be able to replicate the Active Directory database information to one another. Every site must belong to at least one site link, or it will be unusable and the domain controllers in that site will be isolated. Active Directory uses site links as indicators for where it should create connection objects; the connection objects use the actual network connections to exchange directory information.
Purpose of Site Link in Active Directory
The primary function of a 'Site Link' in Microsoft Active Directory is to enable and facilitate replication of Active Directory database information between domain controllers that reside in different sites.
A 'Site Link' is a logical, bidirectional pathway for replication traffic that connects two or more 'Sites' in Active Directory. The creation of a 'Site Link' represents a network path for replication and signifies that there's sufficient network connectivity for domain controllers in the linked sites to replicate Active Directory data. 'Site Links' also allow administrators to control and optimize replication traffic between sites by configuring the replication schedule, frequency, and cost.
By managing 'Site Links' effectively, administrators can ensure that Active Directory data is kept consistent across all domain controllers, regardless of their physical location, while minimizing the impact on network performance.
In summary, a 'Site Link' is a critical element of Active Directory architecture, providing a mechanism for inter-site replication, and allowing for the control of replication traffic based on organizational and network requirements.
A 'Site Link' is a logical, bidirectional pathway for replication traffic that connects two or more 'Sites' in Active Directory. The creation of a 'Site Link' represents a network path for replication and signifies that there's sufficient network connectivity for domain controllers in the linked sites to replicate Active Directory data. 'Site Links' also allow administrators to control and optimize replication traffic between sites by configuring the replication schedule, frequency, and cost.
- The 'replication schedule' determines the times during which replication is permitted on this 'Site Link'.
- The 'replication frequency' refers to how often changes are replicated between the sites when the link is available.
- The 'cost' parameter is used by Active Directory's Knowledge Consistency Checker (KCC) to determine the most efficient route for replication traffic. Lower cost links are preferred over higher cost links.
By managing 'Site Links' effectively, administrators can ensure that Active Directory data is kept consistent across all domain controllers, regardless of their physical location, while minimizing the impact on network performance.
In summary, a 'Site Link' is a critical element of Active Directory architecture, providing a mechanism for inter-site replication, and allowing for the control of replication traffic based on organizational and network requirements.
How to create a site link (Steps)
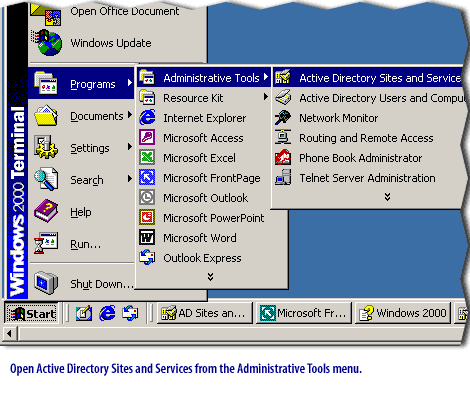
To create a site link:- Open Active Directory Sites and Services from the Administrative Tools menu.
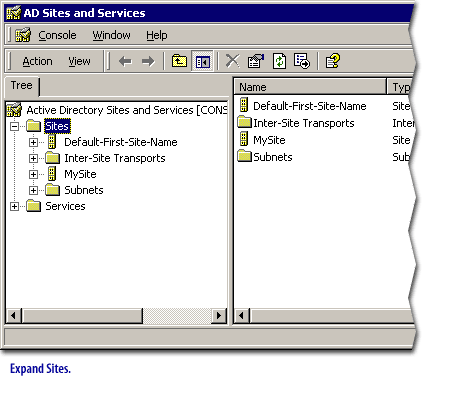
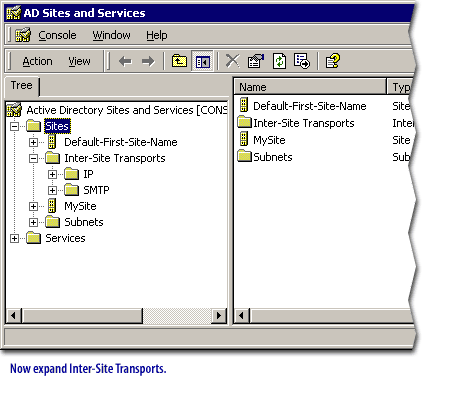
- Expand Sites, and then expand Inter-Site Transports.
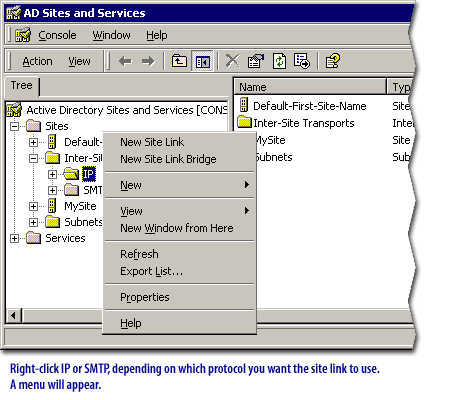
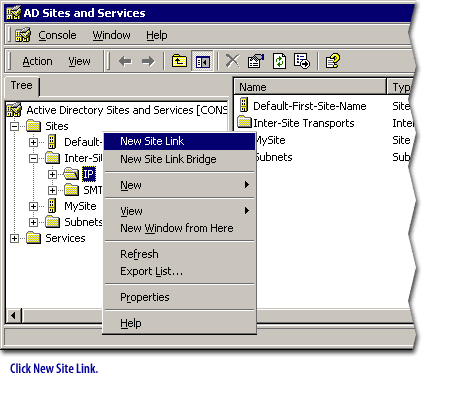
- Right-click IP or SMTP, depending on which protocol you want the site link to use. Then click New Site Link.
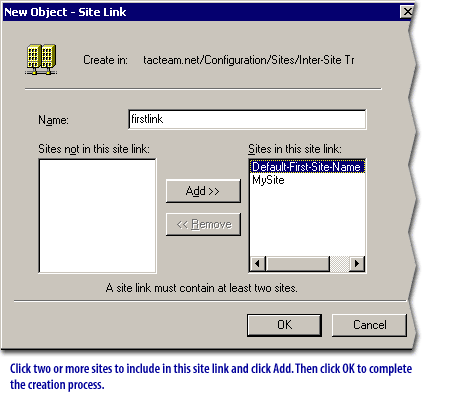
- In the Name box, type the name for the site link.
- Click two or more sites to include in this site link, click Add. Then click OK.
- The site-links below will walk you through this process in detail.
Cost, replication intervals, and schedules
The terms 'cost', 'replication interval', and 'schedule' are properties of an Active Directory 'Site Link'.
These properties allow administrators to fine-tune the behavior of 'Site Links', optimizing them for the organization's specific requirements and network conditions. They enable the efficient propagation of Active Directory data, while controlling network bandwidth usage and replication latency. Proper configuration of these properties can significantly enhance the performance and reliability of your Active Directory environment.
- Cost: This property, expressed as an integer value, is used to determine the most efficient or preferable path for replication traffic when multiple paths are available. Lower cost values indicate preferred paths over higher ones. This enables Active Directory to optimize replication across your network by favoring the most efficient links.
- Replication Interval: This property defines the frequency of replication between sites connected by a 'Site Link'. The interval can be set from a minimum of 15 minutes to a maximum of 10,080 minutes (one week). Setting this property helps balance the need for up-to-date Active Directory data with the need to conserve network bandwidth.
- Schedule: This property specifies the times during which replication can occur over a 'Site Link'. By default, replication is available 24 hours a day, seven days a week. However, administrators can specify a schedule to limit replication to specific times of the day or specific days of the week, allowing them to avoid peak usage times and maintain optimal network performance.
These properties allow administrators to fine-tune the behavior of 'Site Links', optimizing them for the organization's specific requirements and network conditions. They enable the efficient propagation of Active Directory data, while controlling network bandwidth usage and replication latency. Proper configuration of these properties can significantly enhance the performance and reliability of your Active Directory environment.
Cost
The cost of a site link refers to the relative efficiency of using that link for replication. Setting a low cost on a link that uses a high bandwidth connection and a higher cost on a link that uses a slow connection will ensure that the faster connection is used when a domain controller replicates its Active Directory information.
Replication
Replication interval refers to the period of time that goes by between replications. Schedule: refers to the days of the week and/or times of day that replication can occur.
All of these can be configured by the administrator, thus allowing you to control the replication topology and link availability.
Note: Note that when you create the site link, these properties are set to the default values (cost of 100, replication interval of 3 hours, and all periods of time on the schedule available for replication).
Note: Note that when you create the site link, these properties are set to the default values (cost of 100, replication interval of 3 hours, and all periods of time on the schedule available for replication).
How to configure site links
To configure site links, you begin by repeating the steps for creating a site link enumerated above. Once you have decided which protocol you want your site to use, you :
- Right-click the site link, and then click Properties.
- On the General tab of the Properties dialog box, change the values for cost, replication interval, and schedule as needed, and then click OK.
In the next lesson, you willl learn how to create bridges between your site links.