| Lesson 2 | Install Active Directory |
| Objective | Run the Installation Wizard to Install Active Directory |
Running the Installation Wizard to Install Active Directory on Windows Server 2019
Follow these step-by-step instructions to run the Installation Wizard for installing Active Directory on Windows Server 2019. This process involves installing the Active Directory Domain Services (AD DS) role and promoting the server to a domain controller.
After completing these steps, you will have successfully run the Installation Wizard to install Active Directory on Windows Server 2019.
- Launch Server Manager: Open Server Manager from the Windows Start menu or the taskbar icon.
- Open 'Add Roles and Features' wizard: In Server Manager, click 'Manage' in the top-right corner, and then select 'Add Roles and Features' from the drop-down menu.
- Begin the Installation Wizard: Click 'Next' on the 'Before you begin' page to proceed with the installation.
- Select Installation Type: Choose the 'Role-based or feature-based installation' option, and click 'Next'.
- Select Destination Server: Ensure the correct server is highlighted in the 'Server Pool' list. Click 'Next' to continue.
- Install the AD DS Role: On the 'Select server roles' page, locate and check the box for 'Active Directory Domain Services'. A new window will appear, detailing the additional features required for AD DS. Click 'Add Features' and then click 'Next'.
- Confirm Additional Features: Click 'Next' on the 'Select features' page without making any changes.
- Review AD DS Information: Read the information provided about AD DS on the 'Active Directory Domain Services' page, and click 'Next'.
- Confirm Installation Selections: Review your selections on the 'Confirm installation selections' page. Click 'Install' to begin the installation process.
- Monitor Installation Progress: Wait for the installation to complete. The progress will be displayed on the 'Installation progress' page.
- Promote the Server to a Domain Controller: Once the installation is complete, click the notification flag in the upper right corner of Server Manager, and select 'Promote this server to a domain controller'.
- Complete the AD DS Configuration Wizard: Follow the steps in the AD DS Configuration Wizard to configure the domain controller based on your requirements (creating a new forest, adding to an existing domain, or creating a new domain within a forest).
After completing these steps, you will have successfully run the Installation Wizard to install Active Directory on Windows Server 2019.
Install Active Directory on Legacy Systems
It is time to install AD on a Windows or Windows Server 2016 server. Before you start installing, you need to be sure that your network is prepared to support Active Directory. This centers primarily on the DNS service, since Active Directory lives and dies by DNS name resolution.
Before you install AD, be sure that you are prepared with a DNS domain name that matches the name of your forest root domain. If your Windows machines are going to be publicly accessible via the Internet, this means selecting a unique Internet domain name and registering it with an Internet name registrar. If your AD installation is only going to be accessed by your internal network users, you can select any domain name you like, though it is a good idea to select a domain name that is not going to interfere with any of your clients who access the Internet. For example, giving your private Active Directory domain the name of google.com will make for some interesting results the first time you try to perform a web search with the popular search engine. You should consider selecting a unique domain name even if you are not planning on making your network publicly accessible, since this will make it easier to do so later if you decide so. Alternatively, you can use a top-level domain (TLD) that isn’t one of the Internet standards, using mycompany.local or mycompany.corp instead of mycompany.com.
How to run the Installation Wizard
Running the Installation Wizard is a very straightforward process. Note that the DCPROMO command can also be used to demote a server that is already a domain controller.
- You access the wizard by selecting Run from the Start menu. The Run dialog box appears. Then type
dcpromo.exe, as shown here:

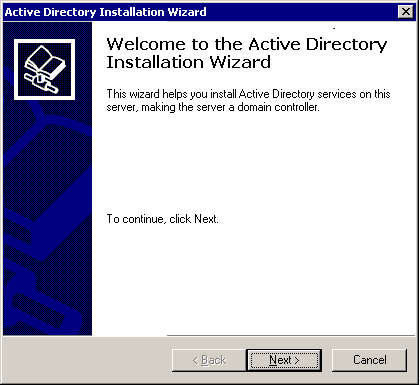
- The Active Directory Installation Wizard appears:

- Once inside the wizard, you are given several options about where to install your domain controller. The option box is shown here:
- Here, the wizard asks you which of the following four areas of Active Directory you wish to create (you can choose only one per installation):
- A new forest, including the root domain (the first domain in the forest) and the first domain controller
- A new child domain and its domain controller in an existing tree
- A new tree and its domain controller in an existing forest
- An additional domain controller in an existing Windows 2000 domain
This module will teach you how to pursue each of these different installation options.
In the next lesson, we will define the requirements and network credentials for installing Active Directory.