| Lesson 5 | Restore files and folders |
| Objective | Use the Backup utility to restore files and folders. |
Restore files and folders using the Backup Utility
Question: How do I restore files and folders using the Backup Utility of Windows Server 2019?
To restore files and folders using the Backup Utility of Windows Server 2019, follow these steps:
The files and folders will be restored from the backup location to the specified destination. Note that if you are restoring files to their original location, any existing files with the same name will be overwritten.
If you need to restore an entire system, you can use the "Full Server" option in the Recovery Wizard to restore the entire system from a full server backup. This option will restore the entire system, including system files, applications, and data, to the backup state.
To restore files and folders using the Backup Utility of Windows Server 2019, follow these steps:
- Open the Windows Server Backup utility by going to Start > Windows Administrative Tools > Windows Server Backup.
- In the Backup utility, click on "Recovery" in the right-hand panel.
- In the Recovery Wizard, select the backup location, such as a local disk or a remote shared folder. Click Next.
- Choose the backup date and time that you want to restore from. Click Next.
- Select the items you want to restore, such as files or folders, and choose the destination for the restored files. You can choose to restore the files to their original location or to a different location. Click Next.
- Review the recovery settings and click "Finish" to begin the restore process.
The files and folders will be restored from the backup location to the specified destination. Note that if you are restoring files to their original location, any existing files with the same name will be overwritten.
If you need to restore an entire system, you can use the "Full Server" option in the Recovery Wizard to restore the entire system from a full server backup. This option will restore the entire system, including system files, applications, and data, to the backup state.
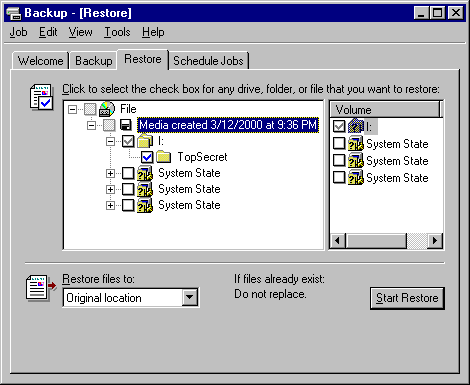
You can use the Backup utility in Windows to restore files and folders.
The Backup utility includes a Restore wizard that steps you through the entire restore process.
Question: What is the order of operations for the Windows Backup utilities to restore files and folders?
The order of operations for the Windows Backup utilities to restore files and folders is as follows:
It is important to follow this order of operations to ensure that the restore process is completed successfully and without errors. Additionally, it is recommended to perform a test restore of files and folders to verify that the backup and restore processes are working correctly before relying on backups for disaster recovery purposes.
The order of operations for the Windows Backup utilities to restore files and folders is as follows:
- Open the Windows Server Backup utility.
- Click on "Recovery" in the right-hand panel.
- Choose the backup location, such as a local disk or a remote shared folder.
- Select the backup date and time that you want to restore from.
- Select the items you want to restore, such as files or folders, and choose the destination for the restored files.
- Review the recovery settings and click "Finish" to begin the restore process.
- If prompted, enter any required credentials for accessing the backup location.
- The restore process will begin, and progress will be displayed in the Backup utility.
- Once the restore process is complete, verify that the files and folders have been successfully restored to the destination location.
It is important to follow this order of operations to ensure that the restore process is completed successfully and without errors. Additionally, it is recommended to perform a test restore of files and folders to verify that the backup and restore processes are working correctly before relying on backups for disaster recovery purposes.
When you restore files and folders, you specify:
- The folders or files to restore
- A restore location. You can restore files to the original location, an alternate location, or to a single folder.
- Restore options, such as whether to replace existing files with backup files