| Lesson 9 | Capture and Deploy a Windows Server 2025 Reference Image |
| Objective | Explain how to generalize, capture, verify, store, and deploy a Windows Server 2025 reference image. |
Capture and Deploy a Windows Server 2025 Reference Image
A Windows Server 2025 reference image is a generalized and reusable operating-system image that can accelerate deployment and disaster recovery across physical servers and virtual machines. The modern workflow replaces the legacy Remote Installation Preparation wizard and the older Windows Deployment Services Capture Image Wizard with a modular process based on Sysprep, Windows Preinstallation Environment, DISM, Windows Imaging Format files, image validation, and automated deployment.
The goal remains the same as in the RIS and RIPrep era: prepare a standardized Windows installation once, capture it, and reuse it to deploy compatible systems consistently. The difference is that Windows Server 2025 separates image preparation, offline capture, deployment orchestration, and recovery into distinct tools and stages.
Relationship to the Previous Lessons
This lesson continues the workflow introduced in Lessons 7 and 8.
- Lesson 7 explained how to prepare a Windows Server 2025 reference computer or virtual machine.
- Lesson 8 explained how the default user profile may optionally be customized using Audit Mode,
CopyProfile, and anunattend.xmlfile. - Lesson 9 explains how to generalize the completed reference installation, capture it as a WIM file, validate it, store it securely, and deploy it through a supported platform.
The focus here is not on repeating the complete reference-image build process. It is on the capture, verification, storage, and deployment stages that follow preparation.
Legacy WDS Capture Workflow
The older WDS-oriented process typically followed these steps:
- Prepare a reference computer.
- Run Sysprep.
- PXE boot into a WDS capture image.
- Launch the WDS Image Capture Wizard.
- Select the system volume.
- Capture the image.
- Upload the WIM to a WDS server.
- Make the image available to PXE clients.
This workflow was a valid successor to RIPrep, but it is no longer the preferred Windows Server 2025 approach. The traditional WDS model that relies on installation-media boot.wim for end-to-end deployment is not supported for Windows Server releases after Windows Server 2022.
WDS PXE transport has not disappeared completely. A deployment environment may still use WDS or another PXE service to deliver a custom WinPE image. However, the primary Windows Server 2025 workflow should be described in terms of custom WinPE, DISM, Microsoft Configuration Manager, or another supported deployment platform.
Modern Windows Server 2025 Workflow
- Prepare and validate the Windows Server 2025 reference system.
- Generalize the operating system with Sysprep.
- Shut down the reference computer.
- Boot directly into a customized WinPE environment.
- Identify the offline Windows volume and image destination.
- Capture the Windows partition as a WIM file with DISM.
- Inspect and verify the WIM metadata.
- Generate and record a SHA-256 hash.
- Store and version the image in a controlled repository.
- Register the image with a supported deployment platform.
- Deploy the WIM through a task sequence or scripted WinPE process.
- Test and validate the completed server.
Prepare and Validate the Reference System
- Confirm the intended Windows Server 2025 edition and installation option.
- Apply current cumulative and security updates.
- Install only approved applications, agents, roles, and features.
- Remove test data, personal files, credentials, tokens, and production secrets.
- Resolve device, service, and application errors.
- Test startup and shutdown.
- Document the build, update level, software, and configuration.
- Confirm that the system is not being used as a production workload.
A dedicated virtual machine is usually preferable to a production physical server because it is easier to recreate, isolate, document, and test. It also avoids unnecessary hardware-specific drivers in a general-purpose image.
Generalize the Installation with Sysprep
Sysprep removes deployment-specific information and prepares the installation to be specialized on another compatible computer.
C:\Windows\System32\Sysprep\Sysprep.exe `
    /generalize `
    /oobe `
    /shutdown
When an answer file is required:
C:\Windows\System32\Sysprep\Sysprep.exe `
    /generalize `
    /oobe `
    /shutdown `
/unattend:C:\Deploy\unattend.xml/generalizeremoves deployment-specific system information./oobeprepares the image for the appropriate first-boot experience./shutdownshuts down the reference computer after generalization./unattendsupplies an answer file used during generalization and specialization.
After Sysprep shuts down the system, do not boot back into the generalized Windows installation before capture. Starting Windows begins specialization and alters the state prepared for imaging.
Boot into Custom Windows PE
Start the reference computer directly in Windows Preinstallation Environment. WinPE may be delivered through a bootable USB drive, mounted ISO, hypervisor virtual DVD, remote-management media such as iDRAC or iLO, or UEFI PXE using a custom WinPE boot image.
The WinPE image should include any required storage, RAID, HBA, NVMe, and network drivers. It may also include PowerShell components, DISM, scripts, and tools used to connect to the image repository.
The Windows installation must be offline during capture. Capturing the active operating system is not the supported model for this workflow.
Identify the Correct Volumes
Drive letters in WinPE may differ from those used while Windows is running. Do not assume that the offline Windows volume is assigned drive C:.
diskpart
list disk
list volume
exit
Before capture, verify the offline Windows partition, destination disk or network share, available free space, file-system paths, and accessibility of the storage repository.
Capture the WIM with DISM
Dism /Capture-Image `
    /ImageFile:D:\Images\Windows-Server-2025-Reference.wim `
    /CaptureDir:C:\ `
    /Name:"Windows Server 2025 Reference Image" `
    /Description:"Generalized Windows Server 2025 reference installation" `
    /Compress:Max `
    /CheckIntegrity `
/Verify/Capture-Imagecreates an image from an existing volume./ImageFilespecifies the output WIM file./CaptureDiridentifies the offline Windows volume./Nameassigns a display name./Descriptionrecords additional image information./Compress:Maxapplies maximum WIM compression./CheckIntegritychecks for corruption./Verifyverifies the captured files.
Write the WIM to a different disk, attached virtual disk, protected network share, or controlled image repository. Do not save the WIM inside the same Windows partition being captured.
Inspect and Verify the Captured Image
Dism /Get-WimInfo `
    /WimFile:D:\Images\Windows-Server-2025-Reference.wim
Confirm the image name, image index, architecture, Windows edition, image size, and description.
Generate a SHA-256 Hash
Get-FileHash `
    -Path D:\Images\Windows-Server-2025-Reference.wim `
    -Algorithm SHA256
Record the SHA-256 value with the image documentation so that corruption or unauthorized modification can be detected later.
Name, Document, and Version the Image
Windows-Server-2025-Standard-Core-v2026.06.wimThe image record should include the image name and version, creation date, Windows Server edition and installation option, build number, cumulative-update level, installed applications and agents, roles and features, answer-file version, Sysprep command, DISM capture command, SHA-256 hash, test status, and responsible administrator.
Do not overwrite a known-good image without preserving version history. Older images should be archived or retired according to policy.
Store the Image Securely
A reference image is a privileged deployment asset. Protect it with NTFS permissions, share permissions, role-based administrative access, release records, backup, integrity monitoring, and change-management procedures.
The image must not contain passwords, access tokens, private keys, personal certificates, cached domain credentials, production data, user documents, browser sessions, or environment-specific secrets.
Deploy the Captured Image
The WIM can be deployed through Microsoft Configuration Manager, custom WinPE automation, scripted DISM workflows, supported third-party deployment systems, hypervisor templates, or cloud image services.
A modern task sequence may start the target server in WinPE, partition and format the disks, apply the WIM, create the boot environment, inject drivers, apply an unattend.xml file, configure the computer name, join the server to a domain, install roles and applications, run PowerShell scripts, apply security baselines, and validate the completed server.
Several task sequences can reference the same base WIM while creating different server roles. This avoids maintaining a separate image for every web server, file server, application server, management server, or backup server.
Apply a WIM Manually with DISM
Dism /Apply-Image `
    /ImageFile:D:\Images\Windows-Server-2025-Reference.wim `
    /Index:1 `
    /ApplyDir:W:\
After applying the image, create the required boot files with the appropriate BCDBoot command. The exact disk layout, drive letters, firmware mode, and boot-partition configuration vary by deployment design.
Windows Deployment Services Qualification
- Unsupported or blocked: installation-media
boot.wimrunning end-to-end Windows Setup in WDS mode for Windows Server 2025. - Still possible: PXE transport of a custom WinPE boot image.
- Recommended: Microsoft Configuration Manager or another supported platform using custom WinPE and automated task sequences.
The legacy WDS Image Capture Wizard should therefore be discussed only as historical context, not as the current primary capture workflow.
Microsoft Deployment Toolkit Qualification
Microsoft Deployment Toolkit should not be recommended as a current Windows Server 2025 deployment platform. MDT was retired in 2026 and should appear only as a legacy technology that may still exist in older environments.
Use the Image for Disaster Recovery
A validated WIM can accelerate the rebuilding of failed physical servers and virtual machines, provisioning of replacement infrastructure, restoration of a standardized operating-system platform, and rebuilding of common server roles.
A reference WIM is not a complete backup of a production server. It does not automatically contain current databases, application data, Active Directory state, system-state data, certificates, private keys, encryption keys, production configuration, or user data.
Test the Captured Image
Successful capture does not prove successful deployment. Deploy the WIM to a test virtual machine or representative physical server and confirm that Windows starts, specialization completes, unattended settings apply, drivers load, networking works, roles and applications install, scripts complete, Group Policy applies, monitoring and security agents register, and Windows Update functions correctly.
Maintain the Reference Image
Reference images must be rebuilt or serviced regularly. Apply current updates, update management and recovery agents, remove obsolete applications, retest Sysprep, verify the WIM hash, test deployment, archive superseded releases, and retire images that no longer meet security requirements.
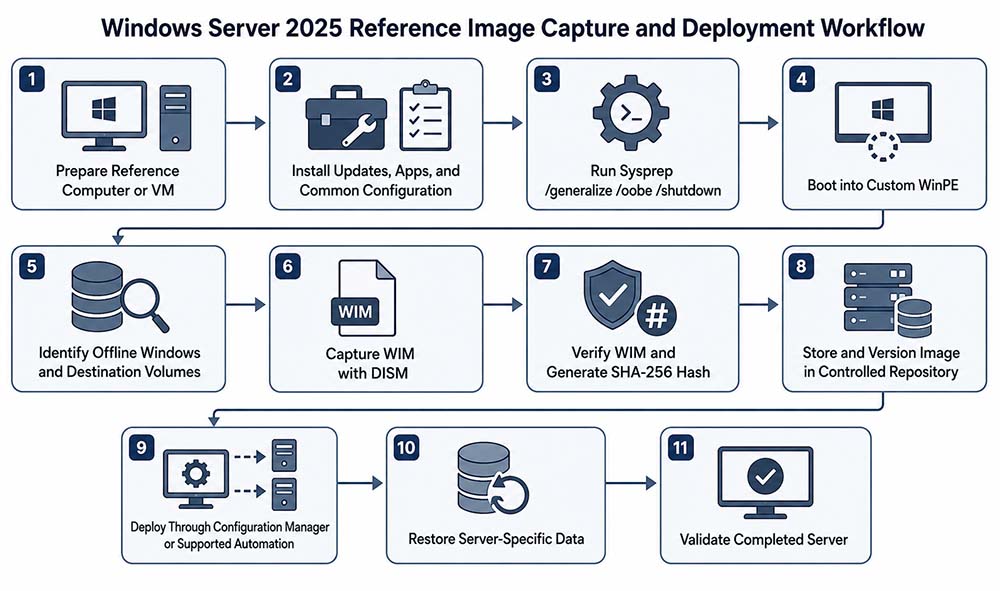
Updated Workflow Diagram
Summary
The WDS Image Capture Wizard workflow has been replaced by a modular Windows Server 2025 image-engineering process. Administrators prepare and validate a reference computer or virtual machine, generalize it with Sysprep, boot into a customized WinPE environment, capture the offline Windows volume as a WIM file with DISM, verify and hash the image, store it in a controlled repository, and deploy it through Microsoft Configuration Manager or another supported automated platform.
Using Windows Deployment Preparation - Exercise
Use the exercise below to apply your knowledge of reference-image capture and deployment.
Windows Deployment Preparation Exercise