| Lesson 5 | Create a RIS Startup disk |
| Objective | Explain how to create a RIS Startup disk. |
Create RIS Startup Disk
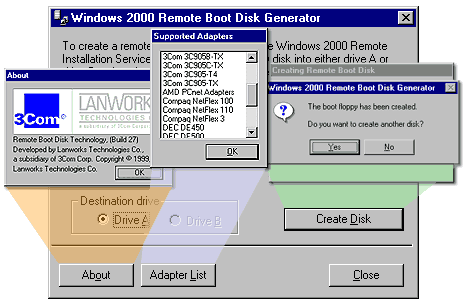
Before actually installing the images on client computers, you must verify that the network adapters of the client computers meet the PXE (Preboot Execution Environment) specification. If a client computer does not have a network adapter that meets the PXE specification, you can remotely install Windows 2000 Professional if the RIS Startup disk supports the network adapter. The RIS Startup disk simulates the PXE startup process for computers with network adapters that do not support PXE. If the computer has a supported network adapter, you can start the computer from the RIS Startup disk and then initiate a RIS session by pressing F12 when prompted.
You can use the same RIS Startup disk on any client computer that has one of the supported network adapters installed. You do not need to create a separate Startup disk for each type of network adapter. To create a RIS Startup disk, perform the following steps:
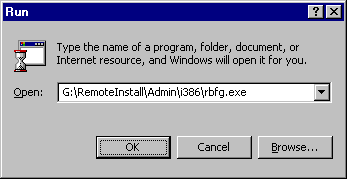
- On any computer running Windows 2000, click Start, and then click Run.
- In the Open box, type
\\RIS_server\reminst\admin\i386\rbfg.exe(where RIS_server represents the name of the RIS server), and then click OK.
- The Windows 2000 Remote Boot Disk Generator dialog box appears. Insert a blank disk into drive A, and then click Create Disk.