The automounter is still used in Red Hat Linux. It is a powerful tool for managing mount points, especially for NFS shares. It can automatically mount and unmount shares on demand, which can save system resources and improve performance. The automounter is configured using a map file, which is typically located at /etc/auto.master. The map file defines the mount points and the locations of the corresponding map files. The map files contain the information needed to mount the shares, such as the NFS server IP address and the mount options.
To use the automounter, you must first install the nfs-utils package. Once the package is installed, you can start the automounter daemon by running the following command:
systemctl start autofs
To configure the automounter, edit the /etc/auto.master file. For example, to automount the NFS share /exports/home from the server 192.168.1.100 to the mount point /home/nfs, you would add the following line to the /etc/auto.master file:
/home/nfs nfs://192.168.1.100/exports/home
Once you have configured the automounter, you can test it by accessing the mount point. For example, to access the /home/nfs mount point, you would run the following command:
cd /home/nfs
If the automounter is configured correctly, the NFS share will be mounted automatically. The automounter is a powerful tool for managing mount points, but it can be complex to configure.
Centralize Administrative Tasks
The automounter is useful for centralizing administrative tasks and decreasing a particular volume's dependency on a single server. Automounting allows you to mount removable media such as CD-ROMs and floppies on-demand. You can configure the automounter to mount network filesystems such as NFS volumes as well. When configured to do so, the Linux automounter mounts filesystems automatically the first time you access them. The automounter makes filesystems automatically accessible whenever you need them. The automounter works by monitoring a particular directory (called an automount point) and taking action whenever a user changes to one of its subdirectories.
Automounting Steps
To get automounting to work, you need to
Configure /etc/auto.master to monitor directories you wish to automount. The format for this file is automount_point map_file. To monitor /auto for accesses, you'd use /auto /etc/auto.local.
Configure each map file. For example, /etc/auto.local might contain your local floppy drive. The following MouseOver illustrates an example of the floppy drive entry in /etc/auto.local.
Entry in /etc/auto.local
1) floppy , 2) -fstype=vfat, 3) :/dev/df0
\
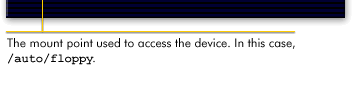
The mount point used to access the device. In this case, /auto/floppy.
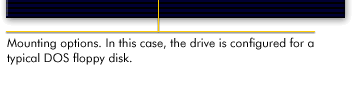
Mounting options. In this case, the drive is configured for a typical DOS floppy disk.
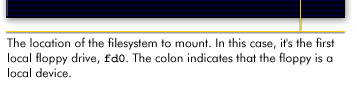
The location of the filesystem to mount. In this case, it is the first local floppy drive, fd0.
The colon indicates that the floppy is a local device.
The next lesson describes the steps to set up the automounter.

 \
\