| Lesson 2 | Installing hardware |
| Objective | List the steps involved in installing a device. |
Installing Windows Computer Hardware
In the last two modules, you learned how to install or upgrade your system to Windows 2000. Now that Windows 2000 is installed,
it is time to begin configuring your computers so that they can take advantage of the functionality offered with Windows 2000.
In this lesson, you will learn how to install a hardware device.
In this lesson, you will learn how to install a hardware device.
- What is hardware? Of course you already know what hardware is, but let's start by reviewing its formal definition. Hardware is defined as any physical device that is connected to a computer and controlled by the computer's microprocessor. Hardware is often referred to, simply, as a device. Devices can include equipment connected to the computer when it was manufactured, as well as peripheral equipment that you add later. Modems, disk drives, CD-ROM drives, print devices, network adapters, keyboards, and display adapter cards are all examples of hardware devices.
Begin by connecting the device
Before installing a device, you must be logged on as an administrator or a member of the Administrators group. The actual connection will vary, depending on the type of device you are installing.
Support for the Universal Serial Bus
Windows 2000 supports a wide range of hardware devices that were not supported in Windows NT 4.0. Built-in support for the Universal Serial Bus makes it possible to add most devices by just plugging them into a
USB port or hub. The devices will be automatically configured by Windows 2000, and resource issues such as IRQ and memory address mappings are quickly and efficiently handled by the USB subsystem.
The table below describes how to connect the different types of devices that you will encounter.
The table below describes how to connect the different types of devices that you will encounter.
| If the device: | Then do this: |
| Needs to be installed into a slot inside your computer, such as a sound card | Shut down Windows and turn off the computer. Remove the computer cover and install the device in the appropriate slot. Replace the computer cover, and then turn on the computer. Note that some computers may have hot-swappable PCI slots . |
| Is a small computer system interface (SCSI) device | Connect it to the SCSI port on your computer according to the device manufacturer's instructions, then restart or turn on your computer. Confirm that the Logical Unit Number (LUN) for the SCSI device is not used by another SCSI device. To change the LUN, see the device manufacturer's instructions. |
| Is a Universal Serial Bus (USB) or Institute of Electrical and Electronics Engineers, Inc. (IEEE) 1394 (Firewire) device | Plug the device into any USB or IEEE port on your computer. Follow the instructions that appear on your screen. You do not need to shut down or turn off your computer when you install or plug in a USB or IEEE 1394 device. |
After installing the device, your next steps will vary, depending on whether the device is a Plug and Play.
You will be instructed to choose a destination path to load the appropriate device drivers, and then to restart your computer, if necessary. A device driver is required for each hardware device, and acts as an intermediary between the hardware and the operating system. Windows 2000 will automatically configure the device so that it works properly with other devices on your computer. This includes assigning the device a unique set of system resources.
You will be instructed to choose a destination path to load the appropriate device drivers, and then to restart your computer, if necessary. A device driver is required for each hardware device, and acts as an intermediary between the hardware and the operating system. Windows 2000 will automatically configure the device so that it works properly with other devices on your computer. This includes assigning the device a unique set of system resources.
Windows System Resources
System resources can include one or more of the following:
- Interrupt request (IRQ) line numbers
- Direct memory access (DMA) channels
- Input/output (I/O) port addresses
- Memory address ranges
Generally, you should not manually change resource settings.
Doing so causes the settings to become fixed, which means that Windows 2000 will have less flexibility when allocating resources to other devices.
If too many resources become fixed, Windows 2000 may be unable to install additional Plug and Play devices.
So, although you can manually configure device properties and settings, you should let Windows 2000 configure properties and settings automatically.
Each assigned resource must be unique, or the device will not function properly.
Each assigned resource must be unique, or the device will not function properly.
If the device is not Plug and Play
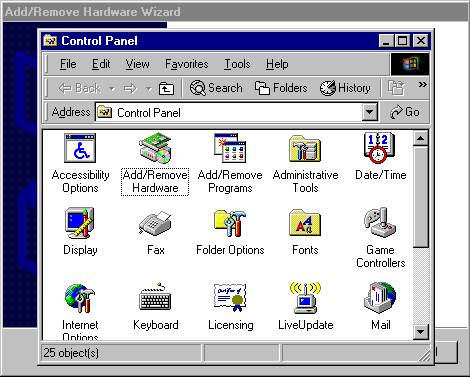
Navigate to the Add/Remove Hardware user interfacein the Control Panel, shown below.
- Identify the type of device that you are installing, then insert the floppy or compact disc that contains the device drivers so that they can be loaded. Depending on the device, the floppy or compact disc will either be provided with Windows 2000 or by the device's manufacturer.
- After the device drivers are loaded onto your system, Windows 2000 configures the properties and settings for the device.
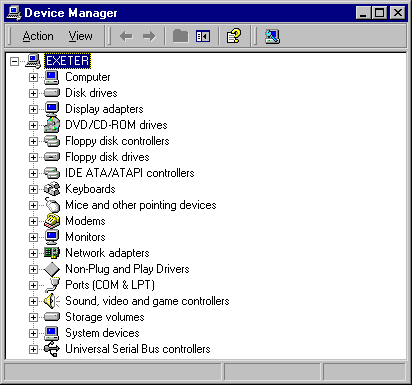
- Depending on the type of device that you are installing, you may need to manually configure the device driver settings using the Device Manager, shown below. The settings should be supplied in the documentation that comes with your device.
How to open the Device Manager in Windows 11
- Press the Windows key + X or right-click on Start to open the Power
User Menu. - Select Device Manager in the menu. You should see something similar to th-->e example below.

In the next lesson, you will learn how to update a driver after it has been installed.