The technology that has primarily replaced dial-up connections for configuring and connecting outbound Windows Terminal Services sessions is
broadband internet. Here's a breakdown of why:
What is Windows Terminal Services?
Windows Terminal Services (Now a part of Remote Desktop Services) is a technology allowing users to remotely access a full desktop environment or individual applications on a server.
The Role of Dial-up
Dial-up connections used traditional phone lines and modems to establish internet connections.
Their limitations included:
Slow Speeds: Dial-up connections were extremely slow compared to modern standards.
Line Availability: They required an available phone line, which could be inconvenient or unavailable.
Why Broadband is Better
Higher Speeds: Broadband technologies like DSL, cable, or fiber deliver significantly faster internet speeds, critical for seamless remote desktop experiences.
Always-On: Broadband connections are always connected to the internet, eliminating the need to manually "dial-up."
Multiple Devices: A single broadband connection can support multiple users and devices simultaneously.
Modern Alternatives to Terminal Services
While Terminal Services/Remote Desktop Services remain important, other options have emerged:
Cloud-based virtual desktops: Services like Azure Virtual Desktop offer remote desktops hosted in the cloud, providing more flexibility and scalability.
Remote access software: Tools like TeamViewer, AnyDesk, etc., specialize in quick, efficient remote access and control for individuals or small teams.
In Summary
While dial-up connections were once used for Windows Terminal Services connections, broadband technologies have superseded them due to their significantly improved speed, convenience, and ability to support remote work scenarios effectively.
The Network Connection Wizard
You can configure all outbound connections in Windows 2000 with the Network Connection wizard. Much of the work of configuring protocols and services is automated when you use this process. Understanding the options in the Network Connection wizard helps you configure connections efficiently.
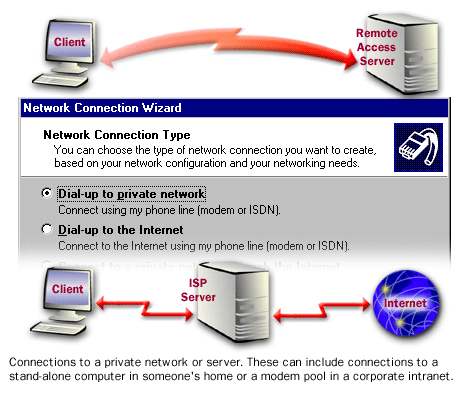
The Network Connection Type Dialog Box
Types of Outbound Connections
There are three basic types of outbound connections:
Dial-up connections
Connections to a VPN
Direct connections to another computer through a cable
Configure an Outbound Dial-up
To create and configure an outbound dial-up connection either to a private network or to an ISP, use the Network Connection wizard. Complete the following simulation to see how to create an outbound connection.
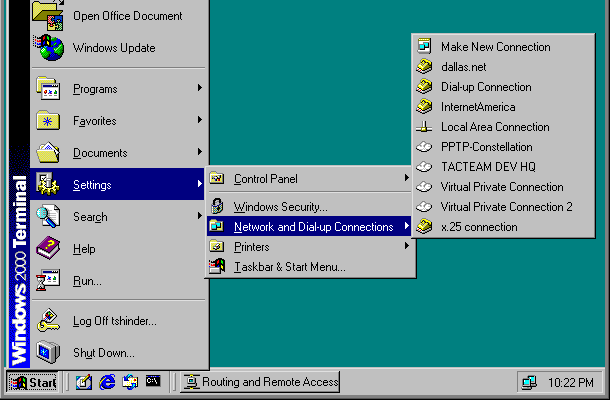
1) Settings Network and Dial Up Connections
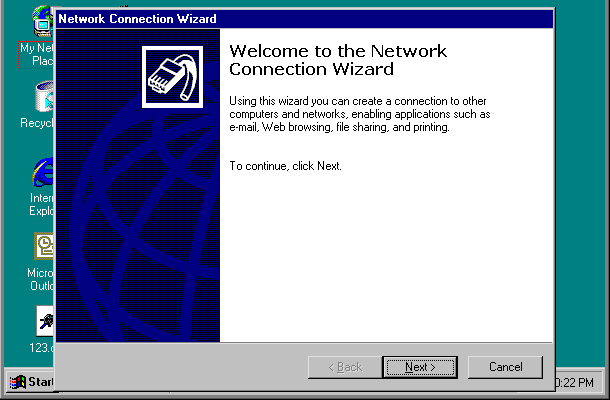
2) Welcome to the Network Connection Wizard
3) Network Connection Type
4) Phone Number to Dial
5) You must specify the phone number of the computer
6) Connection Availability, You may make the connection available to all users
7) Network Connection Wizard
Connection Availability
You may make the new connection available to all users, or just yourself.
You may make this connection available to all users, or keep it only for your own use. A connection stored in your profile will not be available unless you are logged on.
Create this connection:
- ( ) For all users
- ( ) Only for myself
8) Internet Connection Sharing
9) Network Connection Wizard
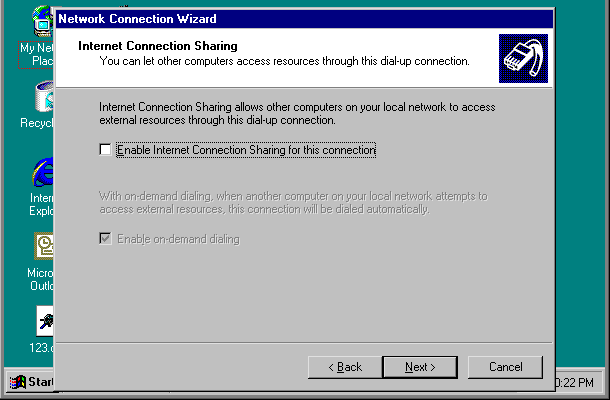
Internet Connection Sharing
You can let other computers access resources through this dial-up connection.
Internet Connection Sharing allows other computers on your local network to access external resources through this dial-up connection.
[ ] Enable Internet Connection Sharing for this connection
With on-demand dialing, when another computer on your local network attempts to access external resources, this connection will be dialed automatically.
[ ] Enable on-demand dialing
10) Network and Dial-up Connections
When Internet Connection Sharing is enabled, your LAN adapter will be set to use IP address 192.168.0.1. Your computer may lose connectivity with other computers on your network. If these other computers have static IP addresses, you should set them to obtain their IP addresses automatically. Are you sure you want to enable Internet Connection Sharing?
[Yes] [No]
11) Job Test 11
12) Job Test 12
For the purposes of this simulation, we have clicked Start>>Settings>>Network>>Dial-up Connections. Click Make New Connection.
new connection
This starts the Network Connection wizard Welcome dialog box. Click Next to move past the Welcome screen. Next
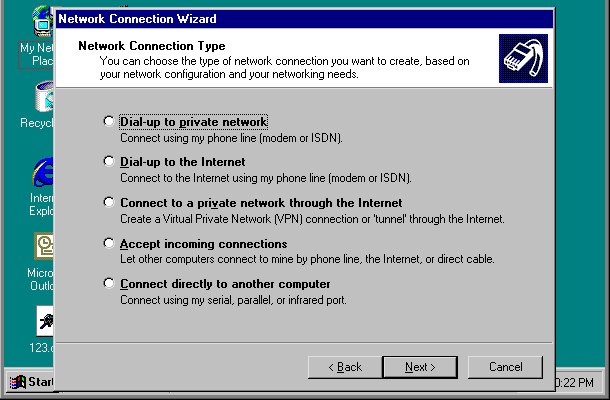
In the Network Connection wizard, select Dial-up to private network. You use this option to connect to a dial-up server. Click Next. dial-up
In the Network Connection wizard, select Dial-up to private network. You use this option to connect to a dial-up server. Click Next.
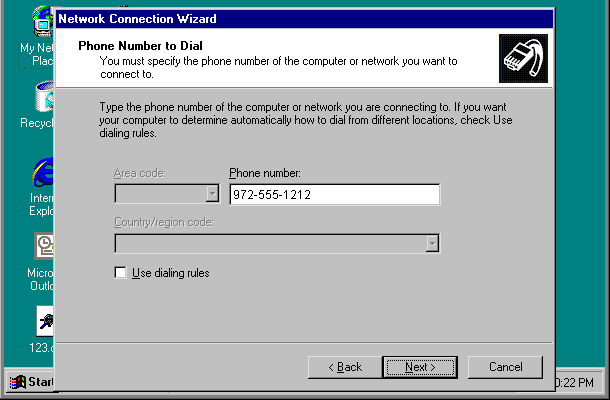
Type the phone number 972-555-1212 in the Phone Number text box. The phone number is for the modem line of your private network, then hit Enter.
Type the phone number 972-555-1212.
Click Next.
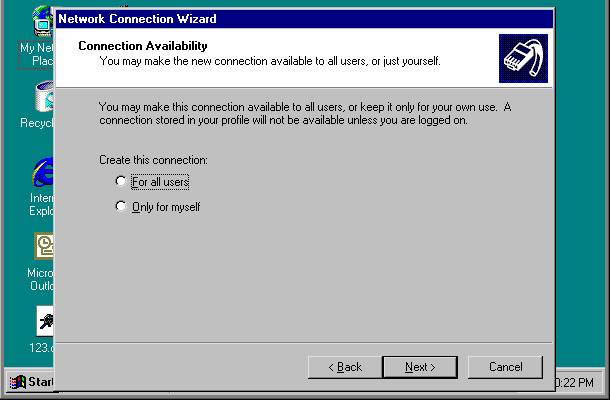
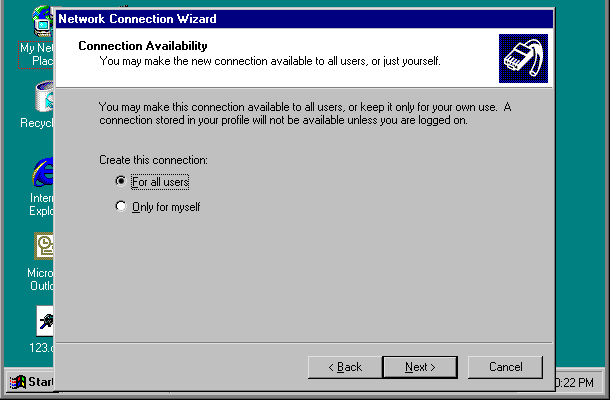
For the purposes of this simulation, you will make this connection available to all users of this computer. Click For all users, and then click Next. If you wanted to reserve the connection for yourself, you would click Only for myself.
for all users
For the purposes of this simulation, you will make this connection available to all users of this computer. Click For all users, and then click Next. If you wanted to reserve the connection for yourself, you would click Only for myself.
To enable other computers to gain access to resources through this dial-up connection, select the Enable Internet Connection Sharing for this connection check box.
enable
Notice that Enable on-demand dialing is activated after you select Enable Internet Connection Sharing for this connection. Click Next.
You are warned that the IP address of the computer will be changed to 192.168.0.1 and that you may lose your connection to the computer, depending on the network ID of the other computers on the segment. Click Yes.
yes
Click Finish.
This is the end of the simulation. Click Exit.
Configuring a dial-up
For the purposes of this simulation, we have clicked Start>>Settings>>Network>>Dial-up Connections. Click Make New Connection.
This starts the Network Connection wizard Welcome dialog box. Click Next to move past the Welcome screen.
In the Network Connection wizard, select Dial-up to private network. You use this option to connect to a dial-up server. Click Next.
Type the phone number 972-555-1212 in the Phone Number text box. The phone number is for the modem line of your private network.
For the purposes of this simulation, you will make this connection available to all users of this computer. Click For all users, and then click Next. If you wanted to reserve the connection for yourself, you would click Only for myself.
To enable other computers to gain access to resources through this dial-up connection, select the Enable Internet Connection Sharing for this connection check box.
You are warned that the IP address of the computer will be changed to 192.168.0.1 and that you may lose your connection to the computer, depending on the network ID of the other computers on the segment. Click Yes.
This is the end of the simulation. Click Exit.
The next lesson explains how to create a Virtual Private Network.

![<strong>Network Connection Wizard</strong>
Internet Connection Sharing
You can let other computers access resources through this dial-up connection.
Internet Connection Sharing allows other computers on your local network to access external resources through this dial-up connection.
[ ] Enable Internet Connection Sharing for this connection
With on-demand dialing, when another computer on your local network attempts to access external resources, this connection will be dialed automatically.
[ ] Enable on-demand dialing](images/dial-up9.gif)
![<strong>Network and Dial-up Connections</strong>
When Internet Connection Sharing is enabled, your LAN adapter will be set to use IP address 192.168.0.1. Your computer may lose connectivity with other computers on your network. If these other computers have static IP addresses, you should set them to obtain their IP addresses automatically. Are you sure you want to enable Internet Connection Sharing?
<br>
[Yes] [No]](images/dial-up10.gif)