| Lesson 2 | The X Windows System |
| Objective | Function and basic installation of the X Windows System |
Basic Installation of the X Windows System
What is the function and basic installation of the X Windows System?
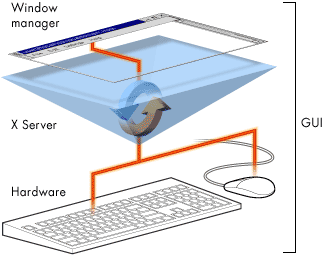
The X Windows System[1] is the foundation for Linux's graphical user interface (GUI). Often referred to as X, the X Windows System provides the necessary tools and functionality to make a GUI. These tools come from a collection of applications found in the various directories under
The X Windows System[1] is the foundation for Linux's graphical user interface (GUI). Often referred to as X, the X Windows System provides the necessary tools and functionality to make a GUI. These tools come from a collection of applications found in the various directories under
/usr/X11R6/.

Running X applications
Any application that conforms to the X standard can run as an X client, as long as an X server is running. The X server provides the interface between X applications, or "clients," and the video hardware. An additional benefit is that X clients do not need to run on the same machine as the X server. An X server and its clients can be across the world from each other.
X client requests
To minimize overhead, the X server only performs basic display functions. X clients request services from the X server such as:
- Display a window
- Draw a blue box
- Send input to a program
- Rastera font
Raster: To apply all transformations (scaling, skewing, rotating, etc.) to a font and display a string of characters on a graphical display.
The server interprets these requests and responds by either granting or refusing the client's request for input or display. If the X server is unable to fill an X application's needs, it notifies the X application that the request is refused.
The server interprets these requests and responds by either granting or refusing the client's request for input or display. If the X server is unable to fill an X application's needs, it notifies the X application that the request is refused.
XFree86
While it is possible to purchase and install a commercial version of X, Linux comes with XFree86[2] a freely available X server. XFree86 comes in source form, and it compiles on many different systems. Red Hat Linux provides packages containing the complete XFree86 source, documentation, libraries, binaries, and fonts.
Installing XFree86
XFree86 installs as part of the default installation procedure. If, however, you elect not to install X Windows, XFree86 may be installed later via the
rpm or gnoRPM .
How do you install the X Windows System?
- The first step in installing the X Windows System is to select the proper monitor. For this simulation, we will use an ADI MicroScan 2E. Click this choice now.
- Now click the OK button to accept this choice.
- After you select the monitor, the install checks to see what video hardware is present and probes for mode information. You can see that the configuration utility has found a mode with 32-bit color depth and high resolution. Select the Let me choose option to select the video modes to enable the information given.
- The third step is to select the video modes you want to use. First, deselect the 1280x1024 setting by clicking the square next to it. To add 1024x768 in 16-bit mode to the list, click the square next to it. Add 800x600 in the 24-bit mode by clicking the square next to it.
- Select OK to accept these two modes.
- Now choose OK to start the X server and test the configuration.
- Congratulations--the X server has started correctly.
[1]X Window System: A collection of programs which act as an intermediate layer between X applications and the computer video hardware, keyboard, and mouse.
[2]XFree86: A popular implementation of the X11R6 X Window System standard used by many operating systems. XFree86 is the default X server for Red Hat Linux.